How to Send Emails Using Your Own Account in Quizify.io (SMTP Settings)
Integration
5 Min Read
Learn how to connect your own email account in Quizify via SMTP for branded send-outs, improved deliverability and full control of your result notifications.

By default, Quizify.io sends all funnel notifications and result emails using our own email domain. However, many users prefer to send and receive emails using their own domain or business email account — for stronger branding, better deliverability, and more control.
That’s exactly where the SMTP (Simple Mail Transfer Protocol) option comes in. With SMTP integration, you can connect your own email service (like Gmail, Outlook, Zoho, or Yahoo) and send funnel notifications, results, and lead alerts directly from your own verified account.
In this guide, you’ll learn:
What is SMTP
Why it’s beneficial to use your own SMTP
How to connect your email account in Quizify.io
What each field means
Example configurations for popular email providers
What Is SMTP?
SMTP (Simple Mail Transfer Protocol) is the standard way of sending outgoing emails from one server to another.
By connecting your SMTP credentials, Quizify will send all your funnel and result emails through your own email server instead of Quizify’s default sender.
This helps you:
Make your emails look professional and on-brand
Improve inbox delivery and reduce spam risk
Receive replies directly in your inbox
Have full control and visibility over your sent emails
Why Use Your Own SMTP with Quizify.io?
Here are some benefits of enabling SMTP:
Improved Deliverability
Emails sent through your domain are less likely to end up in the spam folder.
Stronger Branding
Recipients will see your business name and domain (e.g.,
support@yourdomain.com) instead of a generic sender.Direct Replies
When users reply to your emails, the responses go straight to your inbox.
More Control & Transparency
You manage your own email credentials and sending reputation.
How to Configure SMTP in Quizify.io
To access the SMTP settings:
Go to your Funnel → Email Notification tab.
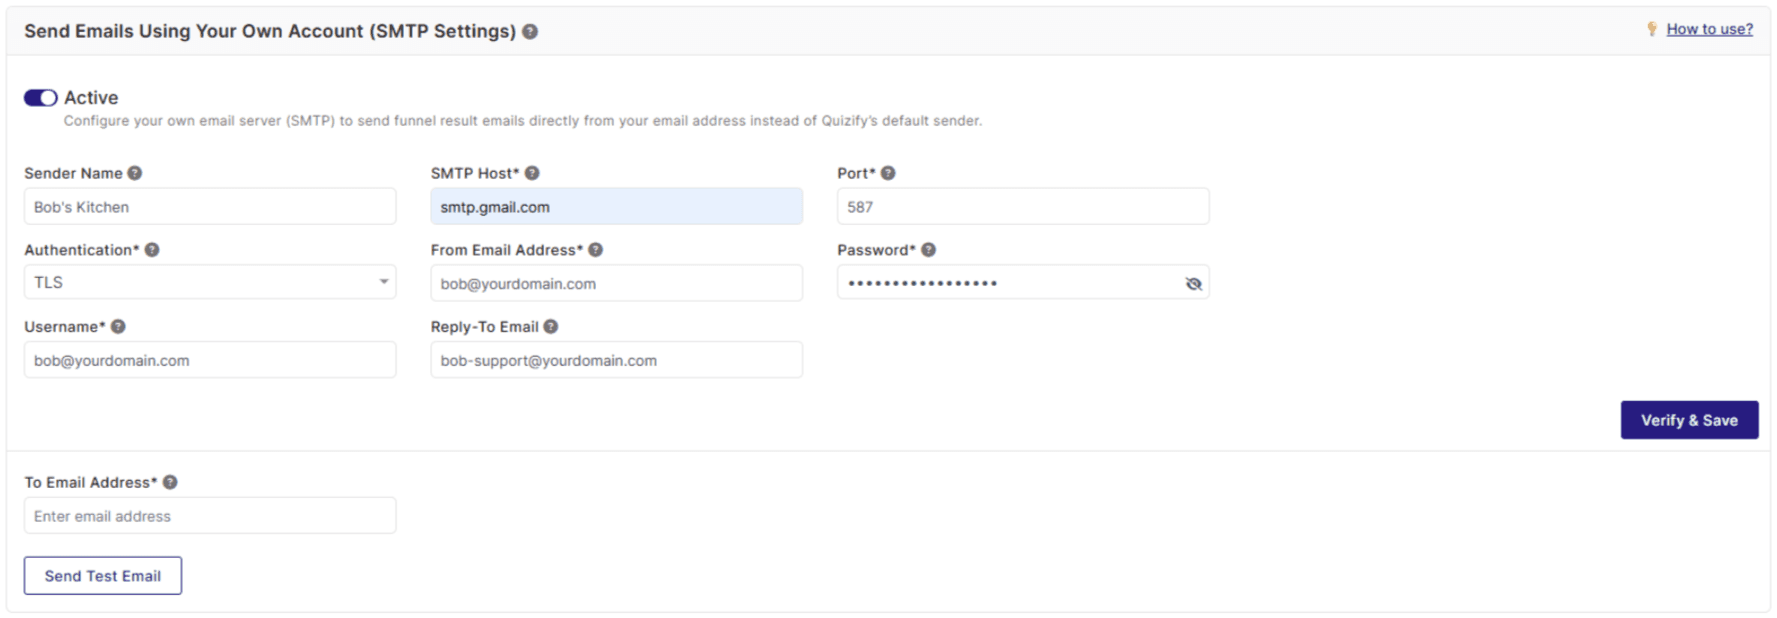
Scroll down to the section titled “Send Emails Using Your Own Account (SMTP Settings)”.
Turn the toggle ON (Active).
Fill in the following details as shown in the configuration panel.
SMTP Configuration Fields Explained
Setting up SMTP correctly ensures that your emails from Quizify are delivered safely and reliably. Below is a breakdown of each configuration field you’ll need to fill in, along with tips and examples to help you connect your email account without any issues.
Sender Name
This is the name that appears in the recipient’s inbox when they receive an email from you.
Example:
Alex from Your BrandorYour Company Team.SMTP Host
The SMTP host is your email provider’s outgoing mail server.
Below are some common SMTP hostnames:
Email Provider
SMTP Host
Gmail
smtp.gmail.com
Zoho Mail
smtp.zoho.com
Brevo
smtp-relay.brevo.com
Outlook / Office 365
smtp.office365.com
Yahoo Mail
smtp.mail.yahoo.com
iCloud
smtp.mail.me.com
Custom Domain (cPanel/Hostinger/etc.)
mail.yourdomain.com
Port
This defines the communication channel used to connect to your email server.
Most commonly used ports:
587 → Recommended, uses TLS encryption (modern and secure)
465 → Uses SSL encryption (older but still supported)
For best results, use Port 587 with TLS
Authentication
Select the type of encryption or authentication used by your email provider.
TLS (Recommended) – Secure and modern.
SSL – Supported by some older servers.
This ensures your email credentials are safely encrypted during the connection.
From Email Address
Enter the email address that you want to use to send emails (e.g.,
support@yourdomain.com).Tip : This should be a verified and active email address from your email provider.
Password
This is your SMTP or App Password, not your normal email login password.
For security reasons, most email services require an App Password when connecting to third-party apps like Quizify.
Here’s how to create one for popular email providers:
Gmail
Go to your Google Account Security page.
Enable 2-Step Verification if not already active.
Go to App Passwords → Choose Mail → Select Other (Custom Name) → Generate.
Copy the generated 16-character password and paste it into Quizify’s Password field.
Zoho Mail
Log into Zoho Mail and go to My Account → Security.
Enable Two-Factor Authentication (TFA).
Click App Passwords → Generate a new password for “SMTP.”
Use that password in Quizify’s Password field.
Brevo
Log in to your Brevo account.
Go to Settings → SMTP & API.
Open the SMTP tab.
Copy your SMTP Key (this works as the password).
Paste this key into Quizify’s Password field.
Outlook / Office 365
Go to Microsoft Account Security.
Enable Two-Step Verification.
Create a new App Password for SMTP.
Copy and paste it into the Password field in Quizify.
Yahoo Mail
Go to your Yahoo Account Security page.
Enable Two-Step Verification.
Click Generate App Password → Select “Mail App.”
Copy the generated password and use it in Quizify.
Custom Domain Email (e.g., cPanel, Hostinger)
Use your normal email password or create a separate SMTP password inside your hosting email settings.
Contact your hosting provider if you’re unsure where to find these credentials.Username
Enter the email username provided by your email service. In most cases, this is the same as your From Email Address.
Example: support@yourdomain.com
Tip: If you’re unsure, use the same email address entered in the From Email Address field.
Note: For Brevo, the username is provided by Brevo and always ends with @smtp-brevo.com.
Reply-To Email (Optional)
This email address is used when recipients reply to your email. If a Reply-To Email is provided, replies will be sent to that address. Otherwise, replies will be sent to the From Email Address.
Example: support@yourdomain.com or help@yourdomain.com
Tip: Use this if you want replies to go to a different inbox.
Verify & Send Test Email
After filling all details:
Click Verify & Save.
You’ll see an option to Send Test Email.
Enter any email address (preferably your own) and send the test.
If the test email arrives successfully — congratulations
Your SMTP connection is active, and all your funnel emails will now be sent through your own email server.
Troubleshooting Tips
If your test email fails or doesn’t arrive:
Double-check your SMTP Host and Port Number.
Make sure App Passwords are correctly generated and used.
Ensure 2-Step Verification is enabled on your account.
Check your Spam or Promotions folder.
If you’re using a company or hosted email, verify that Port 587 or 465 is open on your server.
Conclusion
Connecting your own SMTP account with Quizify.io lets you take full control of your email communications.
Instead of sending from a generic Quizify domain, your quizzes and funnels will send results, notifications, and updates directly from your verified email address — improving professionalism, trust, and delivery rates.
Once configured and verified, you can confidently send all your funnel-related emails directly from your own inbox — secure, branded, and reliable.
By default, Quizify.io sends all funnel notifications and result emails using our own email domain. However, many users prefer to send and receive emails using their own domain or business email account — for stronger branding, better deliverability, and more control.
That’s exactly where the SMTP (Simple Mail Transfer Protocol) option comes in. With SMTP integration, you can connect your own email service (like Gmail, Outlook, Zoho, or Yahoo) and send funnel notifications, results, and lead alerts directly from your own verified account.
In this guide, you’ll learn:
What is SMTP
Why it’s beneficial to use your own SMTP
How to connect your email account in Quizify.io
What each field means
Example configurations for popular email providers
What Is SMTP?
SMTP (Simple Mail Transfer Protocol) is the standard way of sending outgoing emails from one server to another.
By connecting your SMTP credentials, Quizify will send all your funnel and result emails through your own email server instead of Quizify’s default sender.
This helps you:
Make your emails look professional and on-brand
Improve inbox delivery and reduce spam risk
Receive replies directly in your inbox
Have full control and visibility over your sent emails
Why Use Your Own SMTP with Quizify.io?
Here are some benefits of enabling SMTP:
Improved Deliverability
Emails sent through your domain are less likely to end up in the spam folder.
Stronger Branding
Recipients will see your business name and domain (e.g.,
support@yourdomain.com) instead of a generic sender.Direct Replies
When users reply to your emails, the responses go straight to your inbox.
More Control & Transparency
You manage your own email credentials and sending reputation.
How to Configure SMTP in Quizify.io
To access the SMTP settings:
Go to your Funnel → Email Notification tab.
Scroll down to the section titled “Send Emails Using Your Own Account (SMTP Settings)”.
Turn the toggle ON (Active).
Fill in the following details as shown in the configuration panel.
SMTP Configuration Fields Explained
Setting up SMTP correctly ensures that your emails from Quizify are delivered safely and reliably. Below is a breakdown of each configuration field you’ll need to fill in, along with tips and examples to help you connect your email account without any issues.
Sender Name
This is the name that appears in the recipient’s inbox when they receive an email from you.
Example:
Alex from Your BrandorYour Company Team.SMTP Host
The SMTP host is your email provider’s outgoing mail server.
Below are some common SMTP hostnames:
Email Provider
SMTP Host
Gmail
smtp.gmail.com
Zoho Mail
smtp.zoho.com
Brevo
smtp-relay.brevo.com
Outlook / Office 365
smtp.office365.com
Yahoo Mail
smtp.mail.yahoo.com
iCloud
smtp.mail.me.com
Custom Domain (cPanel/Hostinger/etc.)
mail.yourdomain.com
Port
This defines the communication channel used to connect to your email server.
Most commonly used ports:
587 → Recommended, uses TLS encryption (modern and secure)
465 → Uses SSL encryption (older but still supported)
For best results, use Port 587 with TLS
Authentication
Select the type of encryption or authentication used by your email provider.
TLS (Recommended) – Secure and modern.
SSL – Supported by some older servers.
This ensures your email credentials are safely encrypted during the connection.
From Email Address
Enter the email address that you want to use to send emails (e.g.,
support@yourdomain.com).Tip : This should be a verified and active email address from your email provider.
Password
This is your SMTP or App Password, not your normal email login password.
For security reasons, most email services require an App Password when connecting to third-party apps like Quizify.
Here’s how to create one for popular email providers:
Gmail
Go to your Google Account Security page.
Enable 2-Step Verification if not already active.
Go to App Passwords → Choose Mail → Select Other (Custom Name) → Generate.
Copy the generated 16-character password and paste it into Quizify’s Password field.
Zoho Mail
Log into Zoho Mail and go to My Account → Security.
Enable Two-Factor Authentication (TFA).
Click App Passwords → Generate a new password for “SMTP.”
Use that password in Quizify’s Password field.
Brevo
Log in to your Brevo account.
Go to Settings → SMTP & API.
Open the SMTP tab.
Copy your SMTP Key (this works as the password).
Paste this key into Quizify’s Password field.
Outlook / Office 365
Go to Microsoft Account Security.
Enable Two-Step Verification.
Create a new App Password for SMTP.
Copy and paste it into the Password field in Quizify.
Yahoo Mail
Go to your Yahoo Account Security page.
Enable Two-Step Verification.
Click Generate App Password → Select “Mail App.”
Copy the generated password and use it in Quizify.
Custom Domain Email (e.g., cPanel, Hostinger)
Use your normal email password or create a separate SMTP password inside your hosting email settings.
Contact your hosting provider if you’re unsure where to find these credentials.Username
Enter the email username provided by your email service. In most cases, this is the same as your From Email Address.
Example: support@yourdomain.com
Tip: If you’re unsure, use the same email address entered in the From Email Address field.
Note: For Brevo, the username is provided by Brevo and always ends with @smtp-brevo.com.
Reply-To Email (Optional)
This email address is used when recipients reply to your email. If a Reply-To Email is provided, replies will be sent to that address. Otherwise, replies will be sent to the From Email Address.
Example: support@yourdomain.com or help@yourdomain.com
Tip: Use this if you want replies to go to a different inbox.
Verify & Send Test Email
After filling all details:
Click Verify & Save.
You’ll see an option to Send Test Email.
Enter any email address (preferably your own) and send the test.
If the test email arrives successfully — congratulations
Your SMTP connection is active, and all your funnel emails will now be sent through your own email server.
Troubleshooting Tips
If your test email fails or doesn’t arrive:
Double-check your SMTP Host and Port Number.
Make sure App Passwords are correctly generated and used.
Ensure 2-Step Verification is enabled on your account.
Check your Spam or Promotions folder.
If you’re using a company or hosted email, verify that Port 587 or 465 is open on your server.
Conclusion
Connecting your own SMTP account with Quizify.io lets you take full control of your email communications.
Instead of sending from a generic Quizify domain, your quizzes and funnels will send results, notifications, and updates directly from your verified email address — improving professionalism, trust, and delivery rates.
Once configured and verified, you can confidently send all your funnel-related emails directly from your own inbox — secure, branded, and reliable.
Join our newsletter list
Sign up to get the most recent blog articles in your email every week.
Similar Topic
Related Blogs


More Articles
Latest Blogs
More Articles